Productivity Tools for Kubernetes

If you are using Kubernetes and you still have to write all kubectl commands like this: kubectl --context my-ctx --namespace my-namespace ..., then you are probably wasting so much time in typing repeated things and memorizing commands or keeping too many notes. There are a lot of useful tools that can make working with kubectl much more productive. I will list in this post some of those tools that saved time for me and made me more confident while working on Kubernetes.
Before you begin
You need to have kubectl installed and some K8s cluster to play with. Maybe you have a test cluster already. If not, you can just make it simple and create a Minikube cluster for learning like in here.
This post is a bit opinionated because I chose only tools that worked well with me after trying many others. I’m also using oh-my-zsh, so some those tools could be different on other shells like bash or fish.
Auto-complete
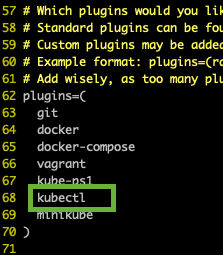
Open ~/.zsrch and find the plugins section and add kubectl to the list. That’s it nothing more. This will give the tab-completion for almost everything related to kubectl. It will auto-complete commands, switches and even resources names.

If you are not using oh-my-zsh, you can find how to set up autocompletion for your environment in Kubernetes docs here
ZSH PROMPT
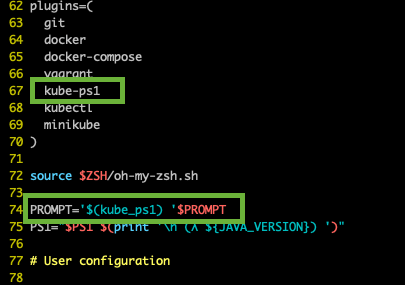
To avoid deleting resources on production by mistake (especially if the DevOps trust you and give all permissions!), I like to always see the current context/namespace in my shell prompt. To do so in oh-my-zsh is very easy. Just open ~/.zshrc and add kube-ps1 to your plugins. Then add this line:
PROMPT='$(kube_ps1) '$PROMPT
That will override PROMPT variable to include $(kube_ps1). You can put $(kube_ps1) before or after '$PROMPT.

This will make you shell prompt something like that:

Aliases and plugins
Aliases
Defining some aliases is also a good idea and still works with autocompletion. When you use the oh-my-zsh plugin kubectl as described above, you will get already some of the useful aliases like k for kubectl and kaf for kubectl apply -f and you can find the full list in this readme. You can edit those aliases by editing file ~/.oh-my-zsh/plugins/kubectl/kubectl.plugin.zsh and you can add your aliases. Another good tool that I prefer is described in this post. The useful thing about this tool that you can modify its [generate_aliases.py] script to generate your aliases syntax bases on what makes sense for you.
Plugins
You can write your own kubectl plugin in a couple of minutes simply by starting its name with kubectl- and make it visible in your PATH and The plugin can be any executable file. If you want to list all available plugins, type kubectl plugin list which will search in you PATh for any file starting with kubectl- that means you can manage your plugins yourself by storing them in one directory, or install them using brew, apt, ..etc. There is also a plugin manager called Krew where you can install/remove/update plugins from a central place.
The first plugin I recommend to start with is kubectx. It’s actually 2 plugins from the same author; One of them is for changing the context and the other is for changing the namespace. If you are also using the oh-my-zsh plugin explained above, you will instantly see the new context and namespace after changing is your terminal prompt.
Kubefwd
kubefwd is a command-line utility built to port forward multiple services within one or more namespaces on one or more Kubernetes clusters. kubefwd uses the same port exposed by the service and forwards it from a loopback IP address on your local workstation. kubefwd temporally adds domain entries to your /etc/hosts file with the service names it forwards. link
We used kubefwd a lot while developing our Kafka ingestion services to simulate a different kind of errors or delays to stabilise our code before deploying to production.
To install kubefwd on mac, you can use homebrew
brew install txn2/tap/kubefwd
And to forward a service e.g. Kafka. You will need sudo because it will add domain entries in /etc/hosts.
sudo kubefwd service -n kafka
Stern
Stern allows you to tail multiple pods on Kubernetes and multiple containers within the pod. Each result is colour-coded for quicker debugging.
The query is a regular expression so the pod name can easily be filtered and you don’t need to specify the exact id (for instance omitting the deployment id). If a pod is deleted it gets removed from tail and if a new pod is added it automatically gets tailed.
When a pod contains multiple containers Stern can tail all of them too without having to do this manually for each one. Simply specify the container flag to limit what containers to show. By default, all containers are listened to. link
You can install stern on mac also by homebrew
brew install stern
And you can tail logs from several pods like this:
stern ingestion -t --since 15m
I was using this tool for debugging while development or deploying to dev or test environments, but for production, it will probably produce too many logs.
 Never miss a story from us, subscribe to our newsletter